top of page


-
In the past, I have always removed the green tops of strawberries using a knife. This was time consuming and wasted the top of the strawberry. I now use a simple plastic drinking straw. Insert the straw through the bottom of the berry pushing up through the top removing the leaves. This is a great way to prepare your strawberries without waste!
-
Next time you need sliced strawberries, get out your egg slicer! Yes, this common household gadget is not just for boiled eggs. Place the strawberry in the slicer sideways and you will create perfectly slice strawberries every time.
-
I use chocolate chips for many recipes, but I don’t always need the whole bag. Here is a great idea to keep your pantry tidy. Cut the top of the chip bag off using scissors. Next cut off the top portion of a plastic water bottle, saving the screw on top. Place the bottle top over the top portion of the chocolate chip bag. Feed the wrapper through the hole and fold it down over the outside of the bottle to create a dispenser. Now you can screw on the top and prevent the chips from making a mess. This also works great for bags of nuts and seeds.
-
When I first heard about this tip I was very skeptical, so I had to try to see if it could possibly work! To separate eggs all you need is an empty water bottle. Simply break your eggs into a bowl. Squeeze the bottle letting some air out, and place the bottle opening on the top of the egg yolk. Stop squeezing forcing the water bottle to go back to the original shape and watch the egg yolk slip right into the bottle leaving the white behind. It is so amazing that the yolk does not break! This is a great tip when only an egg white is needed for a recipe. You can simply screw on the bottle top and store in your refrigerator until the egg yolk is needed. Even if you prefer to separate eggs the traditional way, let your kids try this trick for some kitchen fun!
-
This is such a time saving trick; I know you will use it often. There have been many recipes where I need a cup of cooked corn, or I did not have the time needed to clean and boil fresh corn on the cob. Place 1-2 cobs of corn in the microwave, husks and silk still intake. Microwave the corn on high for 4 minutes. Remove and cool slightly. Cut the top 1 inch off of the corn with a sharp knife. Using an oven mitt or silicone pad, tightly grasp the top of the cob and pull down removing the corn silk and husk in one swoop! You will be amazed how clean and “silk free” the perfectly steamed corn will be.

-
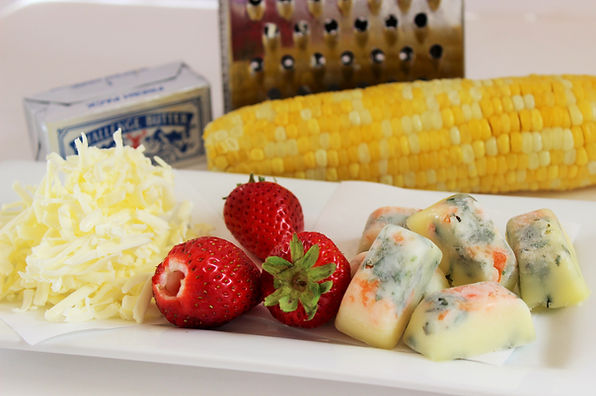
Do you have leftover fresh herbs and don’t know what to do with them? Maybe you have a half of a red bell pepper or onion leftover. Simply dice them and place into the bottom of an ice cube tray. Melt 1-2 sticks of Challenge Butter in the microwave. Fill each well with melted butter using a using a turkey baster and place into the freezer. For variety, try melting one of the Spreadable Butter Varieties such as the Challenge Sea Salt and Cracked Pepper Spreadable Butter. When frozen, remove from tray and place into a freezer safe bag. Next time you sauté chicken or fish, add a frozen butter cube or two to the pan. This will perfectly season your dish and help prevent sticking. When grilling your favorite meat, you can also place a butter cube on top of the hot meat in the last few minutes of grilling or when the meat is hot and still resting. The heat will melt the butter creating the perfect sauce!
-
Don’t throw those Challenge Butter wrappers away! Instead, place them in a freezer zipper lock bag and put them in the freezer. Next time a recipe says to oil or grease a pan you will be ready. Simply use the butter left on the wrappers to grease the pan. Place the wrapper side up and butter side down in your pan and coat your pan with butter. Your hands will stay clean, and you will be able to take recycling to the next level!

-
Have you ever decided to make a recipe and realize you need “softened” butter? If you put it in the microwave it can melt into a mess and softening the old fashioned way can take some time. Next time try this trick. Peel back the wrapper on a stick of Challenge Butter, using the wrapper a “handle” not to mess your hands. Grate the stick of butter with a cheese grater. This will quickly softened your butter with no mess. Simply put the cheese grater in the dish washer and you are good to go!

-
On your next buffet, consider including a bowl of shredded Challenge Butter. Place shreds into a decorative bowl and place in the freezer for about 15 minutes to firm. The shreds are attractive and make buffet serving easy. The shreds spread with ease on fresh bread and allows guests not to fumble as they spread the butter on their corn on the cob!

Time Saving Kitchen Tips and Tricks!
For more great ideas and recipes like this one, please vist www.challengedairy.com
bottom of page